SECTION 46: ENGINE MOUNT & LANDING GEAR
Jump to navigation
Jump to search
Build Instruction Updates
- 10/06/20 46_10.pdf
Check for more recent updates here
Page 46-02
- Good results for the initial alignment can be achieved by centering the engine mount first using rubber embedded dowels. See also this FB thread
- Parts
- Steel dowels: McMaster 8893K178 Tight-Tolerance Oil-Hardening O1 Tool Steel Rod, 0.1875" Diameter, 3 Feet Long. Cut six 1 1/3 inch pieces off and chamfer.
- Rubber fuel line: Aircraft Spruce Part# 05-03597, OD 0.5 inch, ID 0.25 in, cut 6 pieces, 7/8 inch
- Silicone Tubing: Amazon, OD 0.25 in, ID 5/32 in, cut 6 pieces, 7/8 inch
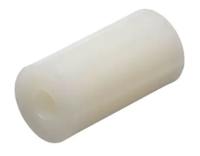
- .5 OD / .257 ID Nylon spacers to guide drilling (fits 1/4 inch drill bit, enlarge as you step up the hole to 3/8): Home Depot
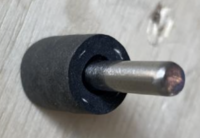
- Insert the silicone hose into the rubber hose.
- Insert the dowel into the silicone hose (tap it in using a hammer).
- Grease the outer side of the rubber hose before inserting the dowels into the six engine mount attach tubes from the front.
- Use a 3/16 drill and run through the 6 engine mount holes. Ensure the 3/16 dowels go in.
- Mount the engine mount. Some of the dowels will be pushed back, try gently to push them into the firewall holes using light taps.
- Remove one dowel at a time (using a punch from the inside, then grab it with nose pliers), drill up the hole using modified Nylon spacers to center the drill, and secure with a bolt. The drill steps are:
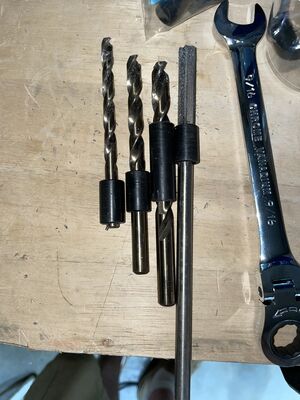
- 3/16 (0.1875) original hole
- 5/16 (0.3125) Note: a 1/4 drill bit will bind / break off, better to do larger steps
- 23/64 (0.359375) Note: recommended hole size for reamer to finish up
- 3/8 reamer (0.375), e.g. at Amazon
- Note: Don't waste the single-use metal stop nuts yet, instead use AN6 castle nuts (from the kit, not used yet) or 3/8-24 hardware store nuts for the drill process.
- Note: AN6 bolts may vary in diameter between .371 and .374. If you ream the hole to .375, there might be some intentional play. Some 3/8 drill bits are only .371 which may lead to binding if you don't ream to .375.
- Note: Some of the 1/2 inch attachment tubes of the engine mount have reduced diameter spots inside from welding. The bushings may bind there. You might have to grind the bushing.
- Note: If you have issues getting the fuel hose out of the hole, use a hook or awl and pierce the hose and pull out. If you have issues getting the nylon bushings out, consider using a screw extractor, e.g. Screw Extractor Set


Page 46-06
- Don't forget to grease the bushings on their outside.
- Tighten to castle nuts to spec, the bushing itself must not rotate. Check that the parts riding on the outside of the bushings still rotate after torquing the castle nuts. If not, see figure 1, it says to remove some of the powder coating if necessary.