SECTION 33: BAGGAGE AREA
Jump to navigation
Jump to search
Build Instruction Updates
- N/A
Check for more recent updates here
Hints
If you intend to place antennas under the rear seats, it will be handy to have access panels/covers installed. Included is a template for fabricating the doubler plate that will fit between the seat ribs.
RV-10 Rear Seat Access Plate Doubler.pdf
RV-10 Rear Seat Access Cover Plate.pdf
PAGE 33-2
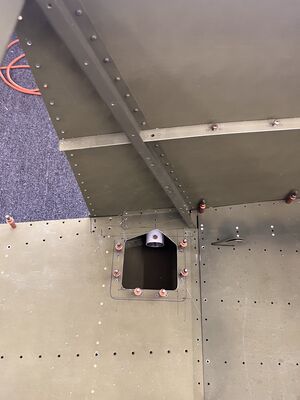
- The baggage floor F-1022A L and R do not have access panels for the bolt in the steel step. In order to get the bolt out we custom fabricated an access panel. See image. It's about 5x5". There is an after market kit made by www.airward.com however it doesn't allow you to remove the bolt if you ever have to replace the step.
- Link to 3rd party access panel: https://www.airward.com/products/airward-vans-rv-10-baggage-compartment-access-cover-kit?_pos=6&_sid=91a4e7e15&_ss=r
- Also some RV10 owners put a RING tie down in this corner to connect a strap for securing baggage compartment stuff. The ring is in this same area. More pictures after I install the ring assembly.
- My custom fabricated version:

Page 33-3
- The F-1026 Lower Baggage Door Seal Channel needs bending so the two flanges are parallel and fit flush on a surface. Look into the top opening to make sure the rear flange sits flush on the F-1006A bulkhead.
- Step 1 The remark regarding already done on QB kits not correct. F-10100A shim needs to be cut out, de burred and installed on a previous step Page 32-5 Step 15. The shim is necessary to allow the door to close flush.
Page 33-5
- Step 1-4 say "Standard Kit" only, but needs completion on quick build kits as well
Page 33-7
- Step 1: Reminder: the center two nutplates on the rear flange are MS21051-L08 (asymmetric, the two rivets are on the same side).
- Step 2: The most forward 426AD3-3.5 rivet can only be done with the back-riveting technique. Consider getting a long back rivet set.
- Step 3: The AN426AD3-4.5 rivets that attach the F-1026 Lower Baggage Door Seal Channel are too short, consider using longer ones. The rivets are hard to buck but you can insert a 5/8" x 1" x 4" (long, slim) tungsten bar with the angled end towards the rivet.
Page 33-8
Note: "left" is referring to airplane's direction of flight, not looking at the corrugated bulkhead as you close out the tailcone
- Step 7: about 15 x 5/32 black clecos (for #8 screw holes) are needed, e.g. part no #20-103 at Pan American Tools.
Page 33-10
- A plate nut drill jig comes in handy for adding the two 3/32 holes on each side of the match drilled #19 screw hole. E.g. at Aircraft Spruce