SECTION 32: TAILCONE ATTACHMENT: Difference between revisions
Jump to navigation
Jump to search
| Line 3: | Line 3: | ||
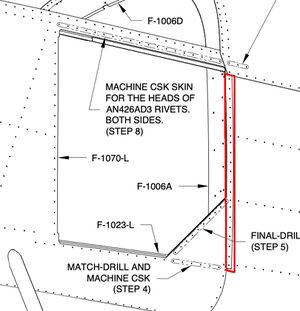
* When to dimple the holes marked in red? Answer: Page 32-5, step 3: Dimple all skins common to the F-1006 A, B & D bulkheads. In this case, it is the F-1006A bulkhead. | * When to dimple the holes marked in red? Answer: Page 32-5, step 3: Dimple all skins common to the F-1006 A, B & D bulkheads. In this case, it is the F-1006A bulkhead. | ||
* Countersinking the side skins: The three holes on the left side skin located rear of the baggage door top (and same three on the right side) need to be flush plus 7 clicks to accommodate a dimpled skin on top of them (you just removed the top skin that covered them), however the horizontal line of holes above the baggage door and the corresponding ones on the right side need to be dimpled flush since nothing goes on top. | * Countersinking the side skins: The three holes on the left side skin located rear of the baggage door top (and same three on the right side) need to be flush plus 7 clicks to accommodate a dimpled skin on top of them (you just removed the top skin that covered them), however the horizontal line of holes above the baggage door and the corresponding ones on the right side, also the six holes on the bottom right of the baggage door, need to be dimpled just flush since nothing goes on top of them. | ||
[[File:Tailcone_attachment.jpeg|500px]] | [[File:Tailcone_attachment.jpeg|500px]] | ||
Revision as of 03:09, 29 March 2022
Page 32-4
- When to dimple the holes marked in red? Answer: Page 32-5, step 3: Dimple all skins common to the F-1006 A, B & D bulkheads. In this case, it is the F-1006A bulkhead.
- Countersinking the side skins: The three holes on the left side skin located rear of the baggage door top (and same three on the right side) need to be flush plus 7 clicks to accommodate a dimpled skin on top of them (you just removed the top skin that covered them), however the horizontal line of holes above the baggage door and the corresponding ones on the right side, also the six holes on the bottom right of the baggage door, need to be dimpled just flush since nothing goes on top of them.
Hints
- Stack at floor joint from bottom to top:
- fuse skin (F-1077)
- tailcone skin (F-1078)
- bulkhead (F-1006B)
- rib tabs (e.g. F-1019-R)
- Use plastic wedges to guide the tailcone bottom skin to go above (inside) the fuselage bottom skin, e.g. at Amazon
- Use two thin strips of aluminum (3/4 inch wide) in the bottom corner sections to guide the tabs of the tailcone to go inside the fuselage skin.
- Use an inflated 20 inch truck inner tube underneath the fuselage center to lift the fuselage slightly, allowing a swivel motion within the fuselage cradle constraints e.g. at Amazon
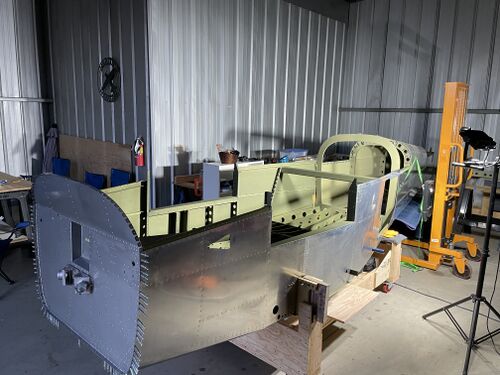
- This is going to be the first section where you will be happy to have a creeper to get underneath the fuselage, e.g. this one at HF.
- Throughout the build, a "pallet stacker" / manual forklift comes in handy. Shown here to raise the tailcone to be level with the fuselage. They ran around $1,000 new on ebay in 2020 but keep their value and allow you to unload the kits from the truck which makes the delivery non-residential thus saving money each time. They can also act as an engine hoist as you can lift the fork 6 feet and hang the engine from a fork. When not in use, they make an adjustable work bench.

