Avionics / Panel: Difference between revisions
Jump to navigation
Jump to search
No edit summary |
|||
| (33 intermediate revisions by 3 users not shown) | |||
| Line 1: | Line 1: | ||
==== Do's and Don'ts ==== | ==== Do's and Don'ts ==== | ||
* Don't remove any material from the ribs supporting the glare shield. | * Don't remove any material from the ribs supporting the glare shield without running it by Vans and re-building the strength. See e.g. [https://www.facebook.com/groups/vansrv10/posts/6138793852908329 this FB thread]. It is possible to place the instruments so that they go left, right or underneath the ribs. | ||
* Don't remove the lowest part of the sub-panel to accommodate GPS units (the bottom part with its flange is structural). Rather cut a rectangular hole for the GPS with rounded corners to avoid stress into the sub-panel and reinforce the cut-out with angle brackets as mentioned in the build manual. | * Don't remove the lowest part of the sub-panel to accommodate GPS units (the bottom part with its flange is structural. If you remove it, you need to reestablish equivalent strength across the cutout). Rather cut a rectangular hole for the GPS with rounded corners to avoid stress into the sub-panel and reinforce the cut-out with angle brackets as mentioned in the build manual. | ||
* Don't put your backup attitude indicator (e.g. a G5) out of sight (on the copilot side, down on the center console) | * Don't put your backup attitude indicator (e.g. a G5) out of sight (on the copilot side, down on the center console) | ||
* Don't put your IFR-certified GPS out of sight (more than 45 degrees to the right, more than 30 degrees down), unless you install a full annunciator panel in sight. | * Don't put your IFR-certified GPS out of sight (more than 45 degrees to the right, more than 30 degrees down), unless you install a full annunciator panel in sight. | ||
* Do ensure you have more space than you need for the connectors. With the wires coming out you want roughly double the length of the connectors for the wires to make their curve. | * Do ensure you have more space than you need for the connectors. With the wires coming out you want roughly double the length of the connectors for the wires to make their curve. | ||
* Do avoid putting anything between the sub panel and the firewall. Its really hard to get there once the plane is complete for inspection or repair. | |||
==== IFR Requirements ==== | |||
* See EAA's [https://www.eaa.org/eaa/aircraft-building/intro-to-aircraft-building/frequently-asked-questions/equipping-a-homebuilt-for-ifr-operations article] on IFR requirements | |||
==== Hints for specific Equipment ==== | |||
* [[GHA-15|Garmin GHA-15 Radar Altimeter]] | |||
* [[GSU-25|Garamin GSU-25 ADAHRS]] | |||
==== Panel Builders ==== | ==== Panel Builders ==== | ||
* Aerotronics [http://www.aerotronics.com/ www.aerotronics.com] | * Aerotronics [http://www.aerotronics.com/ www.aerotronics.com] | ||
* Socal Avionics [https://www.facebook.com/Socalavionics www.facebook.com/Socalavionics] | |||
* Stein Air [https://www.steinair.com/ www.steinair.com] | * Stein Air [https://www.steinair.com/ www.steinair.com] | ||
* Midwest Panel Builders [https://midwestpanels.com/ midwestpanels.com] | * Midwest Panel Builders [https://midwestpanels.com/ midwestpanels.com] | ||
| Line 18: | Line 27: | ||
* [https://www.pacificcoastavionics.com/ Pacific Coast Avionics] | * [https://www.pacificcoastavionics.com/ Pacific Coast Avionics] | ||
* [https://sarasotaavionics.com/g3x Sarasota] | * [https://sarasotaavionics.com/g3x Sarasota] | ||
* [https://www.facebook.com/Socalavionics Socal Avionics] | |||
* [http://www.starkavionics.com/ Stark Avionics] (check customer feedback) | |||
* [https://www.steinair.com/product-category/avionics/ Stein Air] | * [https://www.steinair.com/product-category/avionics/ Stein Air] | ||
==== Avionics Training Material and Courses ==== | |||
* Garmin: [https://static.garmincdn.com/apps/fly/training/garmin-aviation-training-catalog.pdf Catalog] | |||
* Garmin: [https://www.youtube.com/channel/UCIXvvdmJyCvjzT5sbxZTCnA Videos] | |||
==== Avionics Books ==== | |||
* [https://www.amazon.com/gp/product/B0013Q0SNE AeroElectric Connection by Bob Nuckolls] | |||
* [https://shop.eaa.org/products/aircraft-wiring-guide-full-color Aircraft Wiring Guide by Marc Ausman] | |||
==== Wire Gauges ==== | |||
* [[:Media:Cable size.xlsx|Cable Gauge Calculation spreadsheet]] | |||
==== Avionics Settings for RV-10 ==== | |||
* [[Garmin Settings]] Garmin recommendations for AP / servo settings | |||
* [http://www.strikhedonia.com/configuration-g3x-full-garmin-panel-rv10/ Christopher's G3X settings] | |||
==== Making Your Own Panel ==== | ==== Making Your Own Panel ==== | ||
| Line 25: | Line 51: | ||
* [https://support.garmin.com/en-US/aviation/issue/tabs/manuals?identifier=63892 2D CAD-Files from Garmin] ''(DXF-format)'' | * [https://support.garmin.com/en-US/aviation/issue/tabs/manuals?identifier=63892 2D CAD-Files from Garmin] ''(DXF-format)'' | ||
* [https://static.garmin.com/pumac/g3xstepfiles3.zip 3D CAD-Files from Garmin] ''(Step-format, most G3X, Audio and GPS instruments)'' | * [https://static.garmin.com/pumac/g3xstepfiles3.zip 3D CAD-Files from Garmin] ''(Step-format, most G3X, Audio and GPS instruments)'' | ||
* [[Tools needed to wire a Garmin panel]] | |||
* [[Wires needed to wire up your panel]] | |||
* [https://www.youtube.com/watch?v=2EEeRfTIZ28&list=PLUp35uc5zMnXLDrWUdEOg6KmpbJ3jDCJD Garmin Videos] | |||
---- | ---- | ||
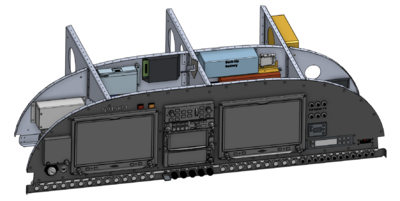
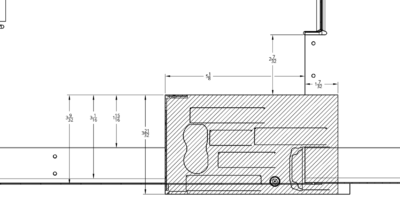
* [https://cad.onshape.com/documents/58051049bcf3496072fa946a/w/9ee1ac39aaf6c431fe3bdfbb/e/7da1ba6f479ce5ebfb6215e3?renderMode=0&uiState=623d448c57fedd6b81806173 Martin's CAD-designed Panel]<br>[[File:RV10_CAD.png|400px|link=https://cad.onshape.com/documents/58051049bcf3496072fa946a/w/9ee1ac39aaf6c431fe3bdfbb/e/7da1ba6f479ce5ebfb6215e3?renderMode=0&uiState=623d448c57fedd6b81806173]]<br>''Hints:<br> | * [https://cad.onshape.com/documents/58051049bcf3496072fa946a/w/9ee1ac39aaf6c431fe3bdfbb/e/7da1ba6f479ce5ebfb6215e3?renderMode=0&uiState=623d448c57fedd6b81806173 Martin's CAD-designed Panel]<br>[[File:RV10_CAD.png|400px|link=https://cad.onshape.com/documents/58051049bcf3496072fa946a/w/9ee1ac39aaf6c431fe3bdfbb/e/7da1ba6f479ce5ebfb6215e3?renderMode=0&uiState=623d448c57fedd6b81806173]]<br>[[File:radio_stack_sub_panel_attach.png|400px]]<br>''Hints:<br> | ||
** Create an account and clone the project. OnShape is free if your files are public. | ** Create an account and clone the project. OnShape is free if your files are public. | ||
** Web-based CAD software, no install necessary. | ** Web-based CAD software, no install necessary. | ||
** Use right mouse-button or two finger drag to rotate the panel. | ** Use right mouse-button or two finger drag to rotate the panel. | ||
** For iPhone and iPad, install OnShape app.'' | ** For iPhone and iPad, install OnShape app.'' | ||
- | * [https://cad.onshape.com/documents/d5409303b6f70a6bafc28bc7/w/ee7f2451916733d545767600/e/04b2d742387e10a9df75b998?renderMode=0&uiState=62604f8269e19a2e2b2e2a30 CAD-design for center panel of Aerosport Async Carbon Panel]<br>[[File:async_panel.png|400px|link=https://cad.onshape.com/documents/d5409303b6f70a6bafc28bc7/w/ee7f2451916733d545767600/e/04b2d742387e10a9df75b998?renderMode=0&uiState=62604f8269e19a2e2b2e2a30]]<br>[[File:async_cutout.png|400px|link=https://cad.onshape.com/documents/d5409303b6f70a6bafc28bc7/w/ee7f2451916733d545767600/e/04b2d742387e10a9df75b998?renderMode=0&uiState=62604f8269e19a2e2b2e2a30]] | ||
* Cutting Services<br>[[File:panel.png|400px]]<br>Above panel laser cut: 0.040 6061:$54, 0.025 2024T3:$182 at [https://www. | * Cutting Services<br>[[File:panel.png|400px]]<br>Above panel laser cut: 0.040 6061:$54, 0.025 2024T3:$182 at [https://www.sendcutsend.com sendcutsend.com]<br>$100 waterjet cut, e.g. at [https://www.waterjetwest.com/ waterjetwest.com] | ||
---- | ---- | ||
* Black Level 2 Anodizing<br>[[File:black_anodized_panel.jpeg|400px]]<br>e.g. $130 (minimum order value) at [https://miramarmetalprocessing.com/ miramarmetalprocessing.com] | * Black Level 2 Anodizing<br>[[File:black_anodized_panel.jpeg|400px]]<br>e.g. $130 (minimum order value) at [https://miramarmetalprocessing.com/ miramarmetalprocessing.com] | ||
---- | ---- | ||
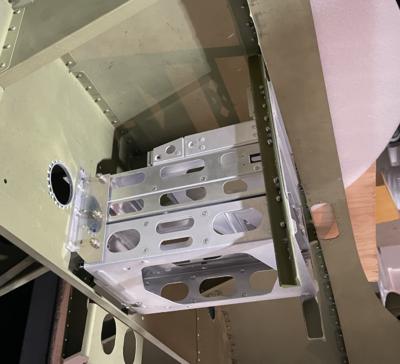
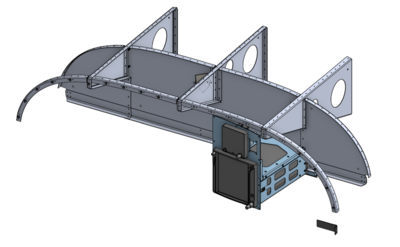
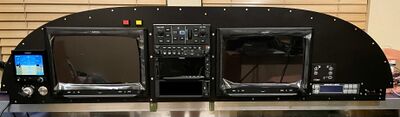
* A view behind another sample panel. No supports cut and nothing between the firewall and the sub panel. | |||
* There is a panel on the right side to hold the remote COM. Nutplates on the bottom bar, and on the subpanel. The Engine box is top right. I'd put it an inch lower next time as the connectors are very tight. | |||
* The radio stack is about as high as it can be. | |||
[[File:DerekSBehindThePanel.jpg|400px]] [[File:PanelLeft.jpg|400px]] [[File:20220310_173015.jpg|400px]] | |||
Latest revision as of 16:01, 11 April 2024
Do's and Don'ts
- Don't remove any material from the ribs supporting the glare shield without running it by Vans and re-building the strength. See e.g. this FB thread. It is possible to place the instruments so that they go left, right or underneath the ribs.
- Don't remove the lowest part of the sub-panel to accommodate GPS units (the bottom part with its flange is structural. If you remove it, you need to reestablish equivalent strength across the cutout). Rather cut a rectangular hole for the GPS with rounded corners to avoid stress into the sub-panel and reinforce the cut-out with angle brackets as mentioned in the build manual.
- Don't put your backup attitude indicator (e.g. a G5) out of sight (on the copilot side, down on the center console)
- Don't put your IFR-certified GPS out of sight (more than 45 degrees to the right, more than 30 degrees down), unless you install a full annunciator panel in sight.
- Do ensure you have more space than you need for the connectors. With the wires coming out you want roughly double the length of the connectors for the wires to make their curve.
- Do avoid putting anything between the sub panel and the firewall. Its really hard to get there once the plane is complete for inspection or repair.
IFR Requirements
- See EAA's article on IFR requirements
Hints for specific Equipment
Panel Builders
- Aerotronics www.aerotronics.com
- Socal Avionics www.facebook.com/Socalavionics
- Stein Air www.steinair.com
- Midwest Panel Builders midwestpanels.com
Avionics Dealerships
- Aerotronics
- Aircraft Spruce
- List of Dynon Dealers
- Midwest Panel Builders Garmin
New to RV-10. I sent them my entire upper forward Fuselage and they designed mounting shelves and mounted every component, designed the panel with my input and did all the wiring. I also purchased all my Garmin avionics from them. They produced schematics for me. - Pacific Coast Avionics
- Sarasota
- Socal Avionics
- Stark Avionics (check customer feedback)
- Stein Air
Avionics Training Material and Courses
Avionics Books
Wire Gauges
Avionics Settings for RV-10
- Garmin Settings Garmin recommendations for AP / servo settings
- Christopher's G3X settings
Making Your Own Panel
- 2D CAD-File from Vans (DXF-format)
- 3D CAD-File from Vans (IGS-format)
- 2D CAD-Files from Garmin (DXF-format)
- 3D CAD-Files from Garmin (Step-format, most G3X, Audio and GPS instruments)
- Tools needed to wire a Garmin panel
- Wires needed to wire up your panel
- Garmin Videos
- Martin's CAD-designed Panel
Hints:
- Create an account and clone the project. OnShape is free if your files are public.
- Web-based CAD software, no install necessary.
- Use right mouse-button or two finger drag to rotate the panel.
- For iPhone and iPad, install OnShape app.
- CAD-design for center panel of Aerosport Async Carbon Panel
- Cutting Services
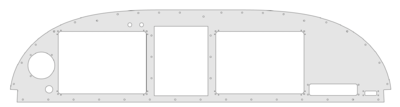
Above panel laser cut: 0.040 6061:$54, 0.025 2024T3:$182 at sendcutsend.com
$100 waterjet cut, e.g. at waterjetwest.com


- Black Level 2 Anodizing
e.g. $130 (minimum order value) at miramarmetalprocessing.com

- A view behind another sample panel. No supports cut and nothing between the firewall and the sub panel.
- There is a panel on the right side to hold the remote COM. Nutplates on the bottom bar, and on the subpanel. The Engine box is top right. I'd put it an inch lower next time as the connectors are very tight.
- The radio stack is about as high as it can be.


